
团队现有核心研发骨干80余人,研究方向包括自主感知、自主控制、通信链路重构、自主路径规划、机械设计、系统设计与集成等。
Pynput是一个用于控制鼠标和键盘的Python库,它可以让你通过编写程序来模拟键盘和鼠标的输入。
本项目调用cvzone库的HandTrackingModule模块里面的HandDetector类进行手部关键点检测和跟踪,并从pynput库中导入keyboard模块的Controller类来创建一个键盘控制器。
import cv2import timeimport cvzoneimport numpy as npfrom cvzone.HandTrackingModule import HandDetectorfrom pynput.keyboard import Controller
cap = cv2.VideoCapture(0) # 读取摄像头# 设置窗口大小:1280*720cap.set(3, 1280) # 窗口宽度cap.set(4, 700) # 窗口高度
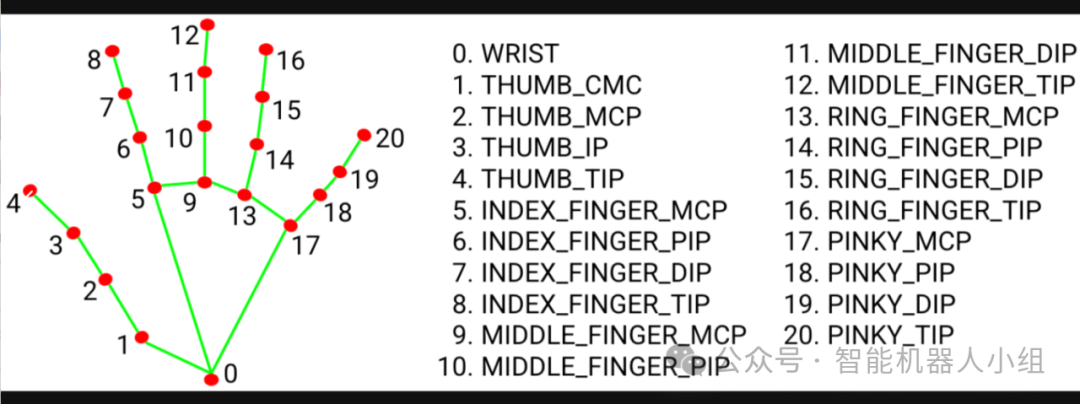

detector = HandDetector(maxHands=1, # 最多检测一只手detectionCon=0.8, # 最小检测置信度minTrackCon=0.5) # 最小跟踪置信度获取手部信息while True:ret, img = cap.read()img = cv2.flip(img, 1) # 因为摄像头是镜像的,所以需要将摄像头水平翻转hand, img = detector.findHands(img, flipType=False)# 存放手指点的信息和手的边界框信息# lmList, bboxInfo = detector.findPosition(img)# draw the visual keyboardimg = drawAll_transparence(img, buttonList)if hand:lmList = hand[0]['lmList']x1, y1,z1 = lmList[8]x2, y2,z2 = lmList[12]for button in buttonList:x, y = button.posw, h = button.size
keyboard = Controller() # 键盘控制器设置按键类class Button():def __init__(self, pos: list, text: str, size=[75, 75]):self.pos = pos # 位置self.size = size # 大小self.text = text # 文本keys_value = [["Q", "W", "E", "R", "T", "Y", "U", "I", "O", "P", "?"],["A", "S", "D", "F", "G", "H", "J", "K", "L", ";", "del"],["Z", "X", "C", "V", "B", "N", "M", ",", ".", "/", "Enter"]]# 将不同属性的按键对象,存放在buttonList列表里buttonList = []计算按键大小for i in range(len(keys_value)):for index, key in enumerate(keys_value[i]):len_key = len(key)if len_key > 1: # 计算按键的字符个数,当超过1时,调整按键的大小;当超过四时,根据字符的个数更新按键大小buttonList.append(Button((80 + 100 * index, 100 * (i + 1)), key, size=(55 * (len_key // 4 + 2), 75)))else:buttonList.append(Button((80 + 100 * index, 100 * (i + 1)), key))绘制键盘# 定义函数,调用buttonList列表中所有的Button对象,并进行绘制;另外进行透明的显示def drawAll_transparence(img, buttonList):imgNew = np.zeros_like(img, dtype=np.uint8) # 创建img的同型矩阵for button in buttonList: # 遍历每个按键# 根据每个矩形框中心点的位置,在一帧图像中画上每个矩形框x, y = button.pos # 获取按键位置(左上角)w, h = button.size # 获取按键大小cv2.rectangle(imgNew, (x, y), (x + w, y + h), (255, 0, 255), cv2.FILLED) # 绘制矩形,并填充cvzone.cornerRect(imgNew, (x, y, w, h), 20, rt=0, colorC=(0, 255, 0)) # 绘制边角cv2.putText(imgNew, button.text, (x + 25, y + 60), cv2.FONT_HERSHEY_PLAIN, 3, (255, 255, 255),thickness=3) # 写入文字out = img.copy()alpha = 0.3mask = imgNew.astype(bool) # 转换数据类型out[mask] = cv2.addWeighted(img, alpha, imgNew, 1 - alpha, 0)[mask] # 透明处理return outreal_num_text = 0 # 记录finalText中真实存在的字符个数num_text = 0 # 记录finalText中的字符个数,为了保证能每60个字符换一次行finalText = "" # 定义输出文本为空,字符串# 每次读取一帧图像,除非有break出现,否则一直在读取并显示变化后摄像头每一帧的图像设置触碰按键的变化if x <= x1 <= x + w and y <= y1 <= y + h:# 当食指的位置,在矩形框中,将矩形框的颜色变浅;文本字体变大cv2.rectangle(img, (x, y), (x + w, y + h), (255, 0, 255), cv2.FILLED) # 矩形背景cvzone.cornerRect(img, (x, y, w, h), 20, rt=0, colorC=(0, 175, 0)) # 矩形边角cv2.putText(img, button.text, (x + 22, y + 65), cv2.FONT_HERSHEY_PLAIN, 4, (255, 255, 255),thickness=3) # 输入的字母设置点击按键的变化# when clickedlen, _, img = detector.findDistance((x1, y1), (x2, y2), img)# 当食指与中指的距离小于50时,执行if语句中的操作if len < 50:# 当食指与中指的距离小于50时,变换矩形框的颜色;文本字体变大cv2.rectangle(img, (x, y), (x + w, y + h), (255, 0, 255), cv2.FILLED)cvzone.cornerRect(img, (x, y, w, h), 20, rt=0, colorC=(255, 0, 0))cv2.putText(img, button.text, (x + 22, y + 65), cv2.FONT_HERSHEY_PLAIN, 4, (255, 255, 255),thickness=3)# 输出button.text的内容到finalText中if button.text == "del":finalText = finalText[0:-1] # 删除最后的字符num_text = num_text - 1if button.text == "Enter":finalText += (50 - num_text % 50) * " " # 补充空格进行换行for i in range(50 - num_text % 50):num_text += 1if button.text != "del" and button.text != "Enter":finalText += button.text # 添加字符num_text += 1time.sleep(0.2) # 每次按键的间隔时间# 显示字符;# 实现换行:当遇到Enter按键时,直接换行;每行满50个字符时,换行times = num_text // 50cv2.rectangle(img, (80, 400), (1200, 450 + times * 25), (255, 0, 255), cv2.FILLED)for i in range(times + 1):cv2.putText(img, finalText[50 * i:50 * (i + 1)], (90, 425 + 25 * i), cv2.FONT_HERSHEY_PLAIN, 2, (255, 255, 255),thickness=2)
原创文章,作者:guozi,如若转载,请注明出处:https://www.sudun.com/ask/88259.html