
基础绘图与视觉元素
本节将介绍如何在Python中使用基础的绘图技术和视觉元素。我们将通过简单的例子,学习如何绘制基本图形、使用颜色和笔刷,以及创建自定义的绘图控件,增强用户界面的视觉效果和交互性。
1. 绘制基本图形
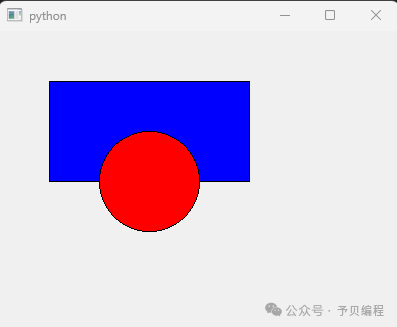

在Python中,可以使用多种库来绘制图形,如PyQt5。我们将以PyQt5为例,展示如何绘制简单的图形。
from PyQt5.QtWidgets import QApplication, QMainWindow, QWidgetfrom PyQt5.QtGui import QPainter, QBrush, QColorfrom PyQt5.QtCore import Qtclass DrawingWidget(QWidget): def paintEvent(self, event): painter = QPainter(self) painter.setBrush(QBrush(QColor(0, 0, 255))) # 蓝色 painter.drawRect(50, 50, 200, 100) # 绘制矩形 painter.setBrush(QBrush(QColor(255, 0, 0))) # 红色 painter.drawEllipse(100, 100, 100, 100) # 绘制圆形class MainWindow(QMainWindow): def __init__(self): super().__init__() self.setGeometry(100, 100, 400, 300) self.setCentralWidget(DrawingWidget())def main(): app = QApplication([]) window = MainWindow() window.show() app.exec_()if __name__ == "__main__": main()
代码解释:
-
创建一个继承自 QWidget的DrawingWidget类,并重写paintEvent方法来绘制图形。 -
使用 QPainter绘制一个蓝色矩形和一个红色圆形。 -
创建主窗口并设置为中央窗口部件。
2. 使用颜色和笔刷
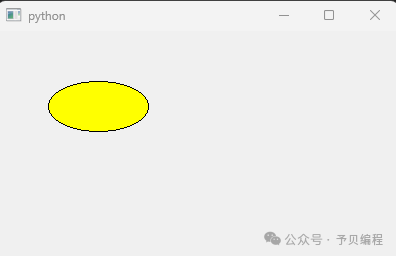
通过设置颜色和笔刷,可以使绘制的图形更加生动。
from PyQt5.QtWidgets import QApplication, QMainWindow, QWidgetfrom PyQt5.QtGui import QPainter, QBrush, QColorfrom PyQt5.QtCore import Qtclass DrawingWidget(QWidget): def paintEvent(self, event): painter = QPainter(self) painter.setBrush(QBrush(QColor(255, 255, 0))) # 黄色 painter.setPen(QColor(0, 0, 0)) # 黑色边框 painter.drawEllipse(50, 50, 100, 50) # 绘制椭圆class MainWindow(QMainWindow): def __init__(self): super().__init__() self.setGeometry(100, 100, 400, 300) self.setCentralWidget(DrawingWidget())def main(): app = QApplication([]) window = MainWindow() window.show() app.exec_()if __name__ == "__main__": main()
代码解释:
-
设置 QBrush的颜色为黄色,用于填充椭圆。 -
设置画笔颜色为黑色,绘制椭圆的边框。
3. 自定义绘图控件
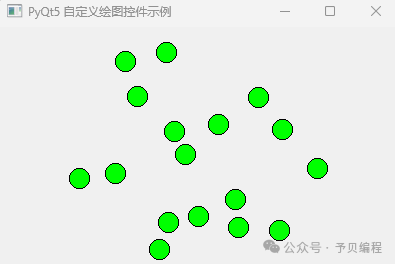
在一些复杂的应用中,我们可能需要创建自定义的绘图控件。通过继承基本的绘图类并添加自定义的绘图逻辑,可以实现更加复杂的图形和交互效果。
from PyQt5.QtWidgets import QApplication, QMainWindow, QWidgetfrom PyQt5.QtGui import QPainter, QBrush, QColorfrom PyQt5.QtCore import Qtclass CustomCanvas(QWidget): def __init__(self, parent=None): super().__init__(parent) self.circles = [] def paintEvent(self, event): painter = QPainter(self) painter.setBrush(QBrush(QColor(0, 255, 0))) # 绿色 for circle in self.circles: painter.drawEllipse(circle[0] - 10, circle[1] - 10, 20, 20) def mousePressEvent(self, event): if event.button() == Qt.LeftButton: self.circles.append((event.x(), event.y())) self.update()class MainWindow(QMainWindow): def __init__(self): super().__init__() self.setGeometry(100, 100, 400, 300) self.setCentralWidget(CustomCanvas(self)) self.setWindowTitle("PyQt5 自定义绘图控件示例")def main(): app = QApplication([]) window = MainWindow() window.show() app.exec_()if __name__ == "__main__": main()
代码解释:
-
继承 QWidget类创建自定义画布CustomCanvas。 -
绑定鼠标点击事件,每次点击时在画布上绘制一个小圆。
总结
通过基础绘图技术和视觉元素的应用,我们可以在Python应用中加入图形和颜色,使得界面更加直观和友好。本文通过实际的代码示例,展示了如何使用常见的绘图方法及其在GUI中的实际运用。
原创文章,作者:guozi,如若转载,请注明出处:https://www.sudun.com/ask/81152.html